

Continued…
Following on from part 1 of our mission to ‘build’ a Raspberry Pi/Retro Pie based retro gaming machine, here’s part 2.
Our bits arrived from ModMyPi well boxed and on time so we can therefore report, based on our limited experience, that ModMyPi seem like a decent bunch.
The Case is Closed
We ordered the standard grey Raspberry Pi 3 case in a frenzy of excitement and then saw all the different crazy cases you can get online (
). This left us thinking maybe we should’ve gone for something a bit more ‘racy’.
These fears were quickly forgotten when we got our hands on the standard case we ordered. It looks good, better than in the pictures and consists of five pieces that easily click together to sandwich the Pi circuit board in place without the need for screws.

Pie in Pi
There are a number of ways you can get RetroPie on to your Raspberry Pi, we tried them and found the easiest method for us was BerryBoot. BerryBoot allows you to easily install different operating systems on your Pi and choose which one to boot from when you power up. This is good because we don’t just want to play games on our Pi we’d also like the option to try out other stuff at a later date.
Installing RetroPie Using BerryBoot
The process is pretty easy.
Step 1 – Prepare the SD Card
To start with there’s a couple of steps to carry out on your normal main computer so you can put the Pi aside for a couple of minutes.
First off prepare the SD card your going to use with your Pi by plugging it into your computer’s SD card slot and formatting it. Be warned, this will delete anything currently on the SD card so if there’s anything you want to keep copy it somewhere safe now.
To do the formatting find your SD card in File Explorer, right click it and select format. On the window that appears make sure you select Fat32 as the ‘file system’ selection and click ‘start’ to kick off the format.
Step 2 – Get BerryBoot
Now get you need to get a copy of BerryBoot which can be downloaded from SourceForge:
https://sourceforge.net/projects/berryboot/
We downloaded the version ‘berryboot-20160313-pi2-pi3.zip’.
Step 3 – Put BerryBoot on to the Raspberry Pi
Once downloaded, locate the BerryBoot file (it should be in zip format) and extract it directly on to your newly formatted SD card. Make sure it’s not in a folder just extract it directly to the root of the SD card.
Step 4 – Power-Up the Pi
That’s it for your normal computer for now, take the SD card out and plug it into your Raspberry Pi. Then plug in your Pi’s power cable, the keyboard and mouse, your game controller and connect the HDMI lead between the Pi and your telly and switch on.
Step 5 – Use BerryBoot to Install RetroPie
Your Raspberry Pi will quickly boot up and show you a window where you need to configure some stuff including locale, some video settings, where you want your OSs to install and also wireless setup. The instructions for this process can be found on the BerryBoot site here.
Once you get to the OS selection bit make sure you select the ‘others’ tab to reveal RetroPie, see below:
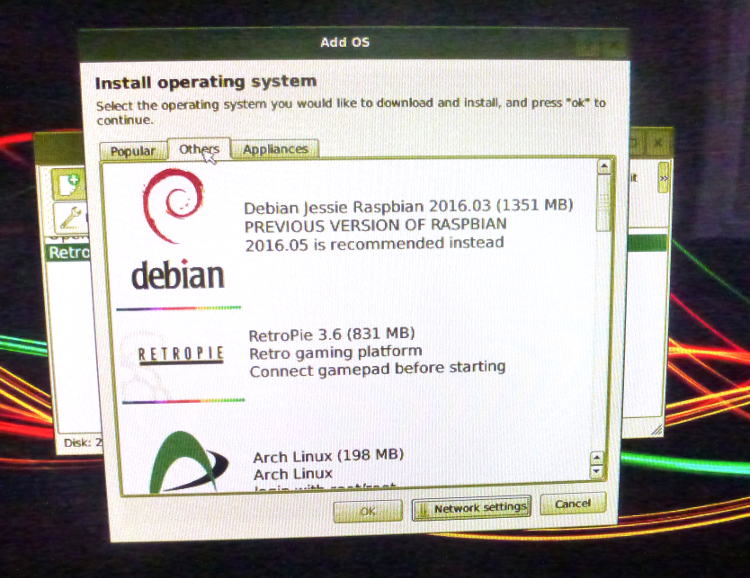
Select RetroPie and install it, this does take a good few minutes so to get in the retro mood you could pretend your waiting for Arcadia to load off cassette.
Step 6 – Fire-Up RetroPie
Once installed, reboot and you should see the BerryBoot OS selection menu in which you will see only RetroPie, select it to boot or wait for it to start booting itself.
And you should be in.
The first thing you need to do is follow the on-screen instructions and configure your game controller, do that and you’re ready to explore RetroPie and try some of the pre-installed games.
Wot no Sound?
Things may be different for you but when we fired up RetroPie we found we had no sound. A common problem apparently.
To solve this you have to edit the config.txt file…don’t panic it’s easy.
Reboot your Pi and when the boot screen appears, click RetroPie so it is selected in the OS selection menu and then click the little box in the top right hand corner with >> in it (we’ve added an arrow in the image below to point it out).
This provides you with some extra options one of which is ‘Edit Config’, click this and then select the ‘config.txt’ tab and you should see something like the image below:
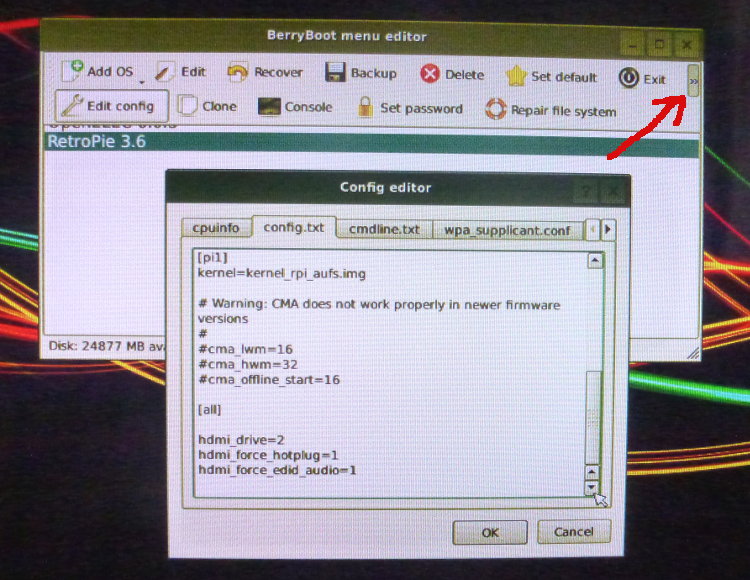
Now use the side-bar to scroll to the bottom of config.txt and you’ll see you haven’t got the last three lines:
hdmi_drive=2
hdmi_force_hotplug=1
hdmi_force_edid_audio=1
Copy these three lines above, paste them at the bottom of your config.txt then click OK and reboot. Hopefully that will have solved your sound problems.
And no…we don’t know what the hell those lines mean either, but they work.
More to Follow
We’re going to have a few games now and see what’s what.
We’ll be back to cover other stuff in part 3 such as where to get games and how to get them on to the RetroPie. Until then, cheerio.